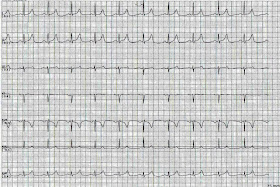
ECG interpretation in telemetry units has been made
easier because of the ability to capture, review and print ECG strips at
specific time in several simultaneous leads. Here we review the new system (GE
telemetry) and how to use/appreciate its built-in functions and master ECG
interpretation.
The
2 lead strip
Figure
1 - Anatomy of the 2-lead strip
The
typical 2-lead printed strip is a real-time captured strip. This is the strip
printed at the start of the shift. So, some of the strips will be
"showered" with artifact because we cannot prevent patient activity.
Saved telemetry data cannot be printed on this 2-lead strip but can be printed
on "FULL DISCLOSURE VIEW".
The
anatomy of the strip is labeled (Figure 1).
The BOX number is now the TTX # that is documented. This is a unique # for each
telemetry box. If a patient is on a different telebox, the central monitor will
not receive a signal.
At
the bottom are tiny black lines which are 3-second markers (Figure 2). There are 15 big boxes between
markers indicating. One second is equal to 5 big boxes and 1 big box is equal
to 0.20 sec or 200 millisecond. So, 15 big boxes multiplied by 0.2 sec is equal
to 3 seconds. The 3-seconds marker can be used to compute the heart rate using
the 6-second method. Count the number of R waves in 6 seconds and multiply by
10. This is the approximate rate in that strip.
Figure
2 - 3 seconds marker and computing the rate using the 6-second method
In the strip above, there are 9 R waves in the
6-second marker. So the rate is 90.
Histogram
Figure 3 - Heart rate trend or heart
rate histogram
The
heart rate trend or heart rate histogram can be printed in the GE system. It is
the graphical representation of the heart rate over time. You can use it to:
1. Check heart rate control
o
in patients with atrial fibrillation who
are on drips (diltiazem and amiodarone)
o
patients with anemia will often present
with tachycardia. Heart rate often improve after transfusion
o
improvement in heart rate in patients
being treated for alcohol withdrawal
4. Marker to print the beginning of a
tachyarrhythmia or conversion from sinus rhythm to another arrhythmia and back
to sinus rhythm
5. Check ranges like how low or how high the
heart rates in 24 hours
Full disclosure
The
full disclosure display is a 1 page 10-seconds strip. It will show all limb
leads (I,II, III, aVr, aVL, aVF) and chest lead/s (V1 and/or V6).
Figure 4 - Full disclosure strip
The
top portion will show the name, MRN (if it is placed in the system), date,
time, heart rate, PVC count, ST analysis of specific lead, and the TTX or box
number.
For
those used to 2-lead strip, it overwhelming to see so much leads. It will take
some time for you to get used to it. Using the full disclosure print-out has a
lot of advantages:
1.
Catch wrong lead placement
In
the strip above (Figure 4), there are
Q waves in I and aVL and P waves are inverted. In normal sinus rhythm (Figure 5), the
P wave morphology is:
·
Upright P in leads I, II and aVF
·
inverted in aVR
·
P wave is variable in leads III and aVL
·
P wave is upright in leads V4-V6
·
Most often biphasic (positive-negative)
in leads V1 and V2
Figure 5 -Normal sinus rhythm in
full disclosure (correct lead placement)
So,
there is wrong lead placement in Figure 4. Figure 6 is after correcting lead placement.
Figure 6 - Full disclosure after
lead placement correction
2.
Check simultaneous leads for PQRST contour/morphological differences
Figure 7 - The 3 fates of a PAC
(some marked in red arrow)
2.1
- ST distortions due to PAC's
To
master ECG interpretation, you have to see more strips and see more leads. Most
of the time, the "funky" arrhythmia
behavior can be explained with one phenomenon. The strip above will be
most of the time interpreted as sinus rhythm, PAC in bigeminy, PVC and onset of
bradycardia. However, if you use full disclosure and compare contour/morphology
of PQRST complexes, it is apparent that this strip is sinus rhythm, PAC in
bigeminy conducted normally, with aberrancy and non-conducted or it showed the
3 fates of a PAC.
2.2
- Capture fusion beats in VT
Figure 8 - Wide complex tachycardia
with no change in QRS direction in the limb leads
In
ventricular tachycardia (VT) discrimination, you should think twice to diagnose
VT if the direction of the QRS complexes are the same during sinus rhythm. However,
in this full disclosure strip (Figure 9),
you can clearly see fusion beat (marked with red arrow below). A fusion beat favors
VT.
Figure 9 - Fusion beat identified in
VT
2.3
- Identifying source of beats
Figure 10 - 2 different shapes of QRS complexes from 2 different sources
Occasionally,
QRS complexes of non-sinus origin will look different. In the strip above (Figure 10), QRS
#1-6 are non-sinus in origin (junctional beats) and QRS #7-10 are sinus beats.
Even if there is a P wave in QRS #1 but its contour or morphology is the same
with QRS #2-6, then QRS #1 is a junctional beat. Difference in QRS morphology
is obvious in all leads.
#630
#630


No comments:
Post a Comment
Note: Only a member of this blog may post a comment.